This is a tutorial that will teach how to host a modded minecraft server with
Fabric on your own machine (you can use a VPS too but then port forwarding is
not needed), then using Proton VPN (or any VPN that allows port forwarding) to
expose your server on the interent safely and linking it to a domain you own so
that you can have a cool URL for your friends to connect to instead of them
needing to switch the IP/port every time you restart your PC (because of the
VPN).
I’m a linux user and thus I’ll show how to do it on linux through a terminal
(most of the time). All things I’m showing can be installed and configured with
GUIs, I will not show how but it’s supposedly easier than through a terminal
(if you’re not familiar with one).
I recommend managing Java versions via Mise
if you’re not good with CLI’s you can use Mise Versions
to browse the package you want to install via Mise.
Docs about how mise handle Java here
(linking for information, you should not need to look at this for this tutorial)
Install Java at version
25.0.2 or the latest current LTS version.
mise use -g java@25.0.2
There are a lot of Java providers as seen here
and in the Mise Versions java page
since this is for a minecraft server and not for long term development that
needs continuous maintenance I recommend installing openjdk at the latest
LTS. If your idea is to have a server running for years and being activelly
maintened you might prefer temurin or whatever is the current recommendation
for development.
To check if the installation worked run
java --version
should show something similar to
openjdk 25 2025-09-16
OpenJDK Runtime Environment (build 25+35-3488)
OpenJDK 64-Bit Server VM (build 25+35-3488, mixed mode, sharing)
You should always install the latest fabric version when possible, then tell
your players the exact version of minecraft and fabric you’re using. In the
example it would be minecraft 26.1.2 and fabric 0.19.3.
With java and fabric installed you can already run a server, on the same
directory you downloaded fabric, agree to Minecraft eula by creating an
eula.txt file with eula=true written in it
echo"eula=true" > eula.txt
then start the server:
This will create the files and directories needed in a minecraft server and
run your server in your local IP with the settings declared at server.properties
-Xms1G means that the minimum memory for the server will always be 1 Gigabyte -Xmx4G means that the maximum memory for the server will be 4 Gigabyte -jar fabric..jar is telling java to run the server using the fabric loader nogui is so that java dont start a graphical interface to show you the server
logs (it will show in the terminal instead)
You can have less minimum memory or more maximum memory if your machine has
more RAM available and you will need to play with those numbers to find the
sweet spot for your server depending on how many mods and players (at the same
time) you have.
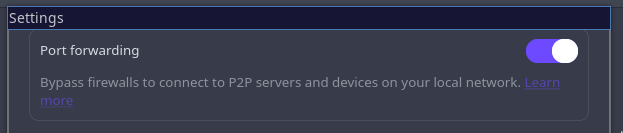
On Proton VPN servers that have port forwarding enabled will show this arrow
icon
Connect to your VPN and you should se a number in your interface indicating the
port they assigned to you
After connecting to the VPN find your IP with this
curl https://api.ipify.org
The current IP for Proton US-NY#297 is 146.70.115.174, this is your VPN IP,
if you dont have a custom domain that IP will be the one you share with your
friends.
IP’s are not static so in a few months this IP might change since ISPs (and VPN
providers) shift IP blocks every now and then for many reasons. It is not
something that happens often so you can save the server you connected to (in my
case US-NY#297 and always connect to it, that way you only need to change the
port when you reconnect to your VPN instead of needing to change both port and
IP.
Some VPNs provide a service of a static port that you can have yourself, if
you want to have a server for years this might be a good thing to look into
to reduce the rassle. The better thing in this case would probably have a VPS
or a static IP from your ISP and do a port forward on your router, even
better if you can have a separated network for your on-prem server and your
house for safety since that would be opening a real port on your machine.
Now get your VPN port in my case 50196 and go to your server.properties,
there you will find a server-port=25565, change that to match your VPN port.
server-port=50196
If you server was open go to the terminal that it was and type /stop to stop
gracefully, else start your server.
Now on your minecraft if you go to localhost:50196 you should be able to join
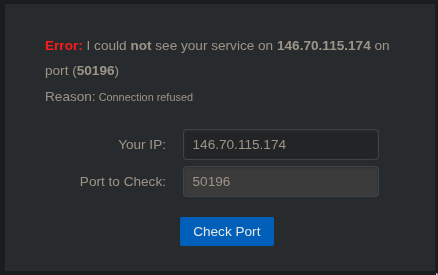
your server, and to check if it’s publicly working you can go to
canyouseeme.org and type your port and IP there.
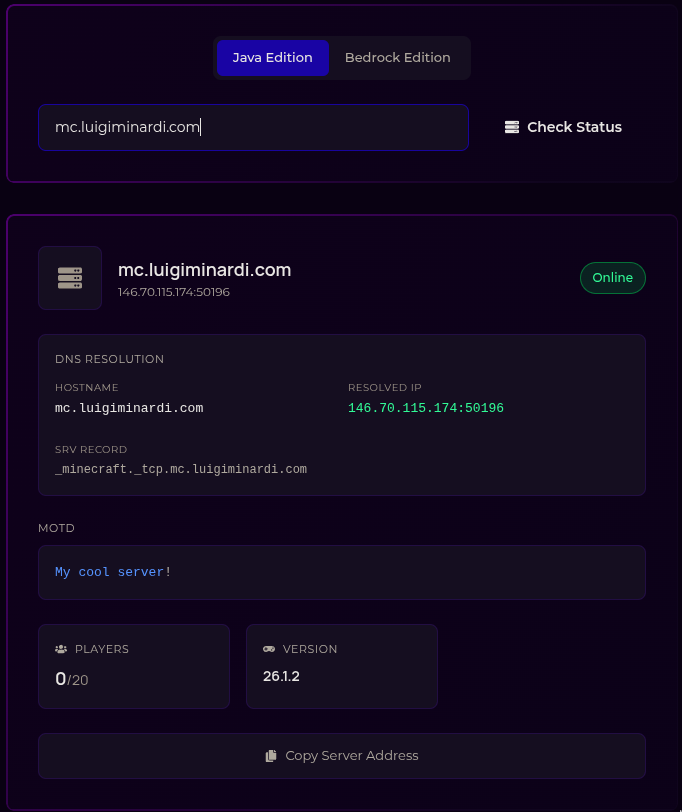
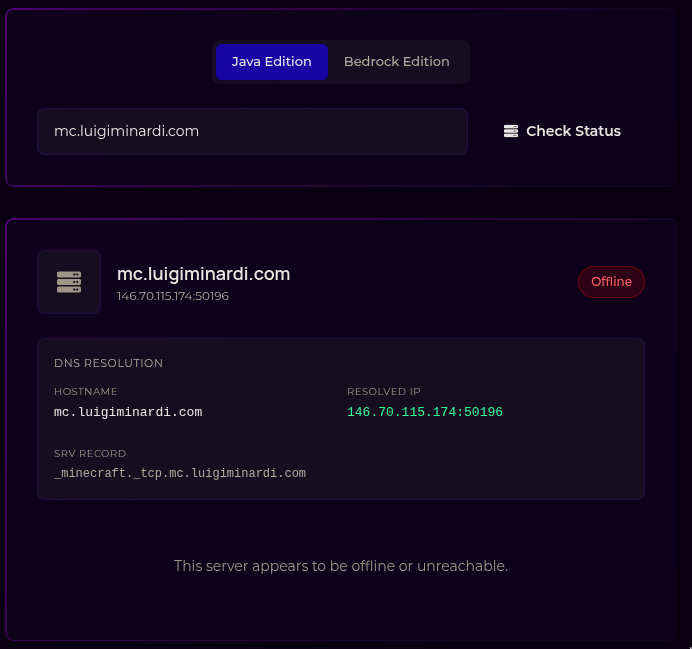
If you don’t have the server open or did something wrong this is what is shown:
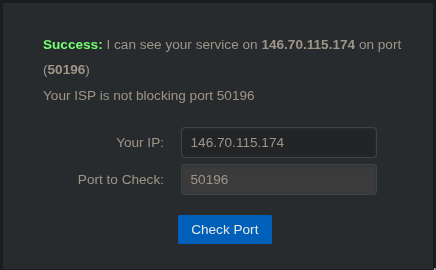
If you are connected to the VPN with port forwarding enabled, edited your server
properties to the correct port and restarted your server this is what you should
see
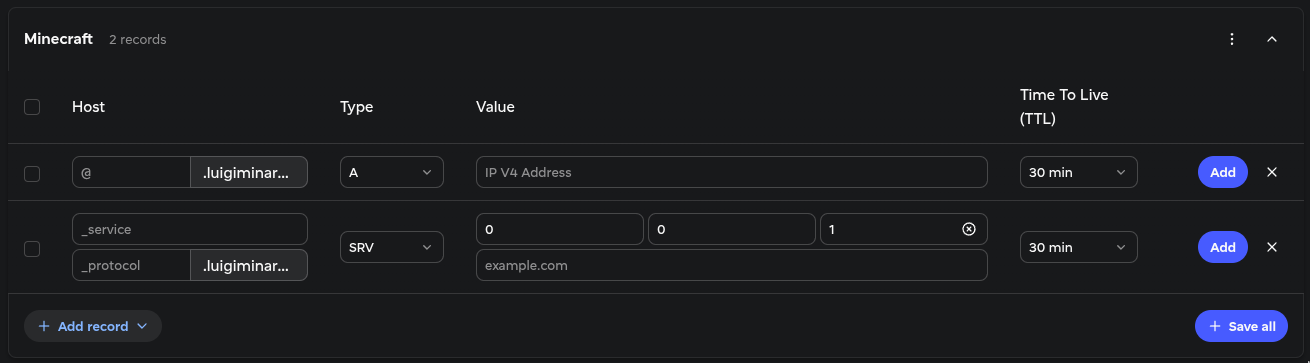
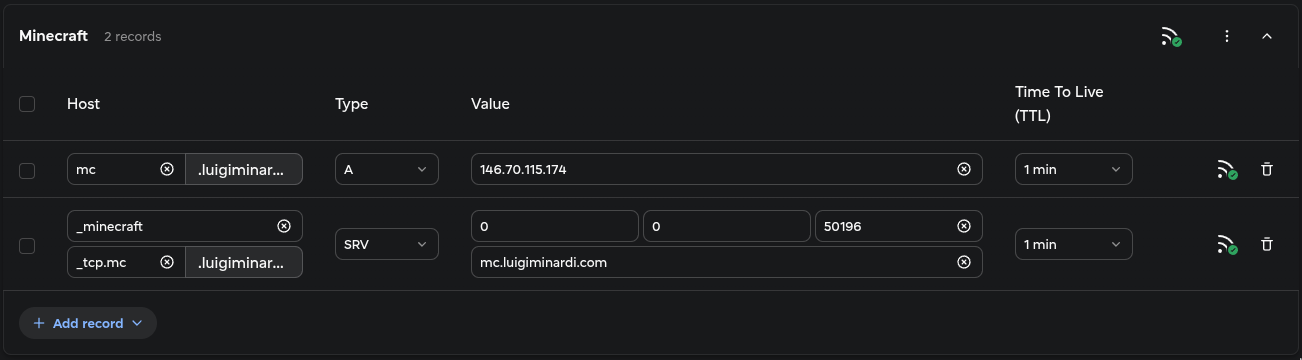
Now go to where you bought your custom domain (your registrar) and go to the DNS
configuration page of your domain. Then you need to add two records, an A
and a SRV one.
As you can see in the image my registrar SRV Host fields only shows the
_service and the _protocol fields, some registrars also have a _name field
after the protocol one.
Set your _service as _minecraft.
If you have a _name field set it the same as the subdomain on the A record
and set your _protocol to _tcp.
If you only have a _protocol you will do _protocol.subdomain as your field
and match the subdomain of your A record in it. So my _protocol will be
_tcp.mc since I need to match the mc of my A record.
On the Value you can see 0, 0, 1 then example.com, that is the
priority, weight, port and target respectively.
If the only thing you have on your domain is the minecraft server priority and
weight can be maintained as 0.
Lower priority numbers are tried first, weight is for load balance between
servers with the same priority, so if you have a huge server you can set 100
in your expensive VPS and 10 in your cheap one and the expesive VPS would get
10x more traffic making the cheap one as a fallback.
The port is the port your VPN provided you (in my case 50196).
The target is your A record Host field (complete), so in my case
mc.luigiminardi.com.
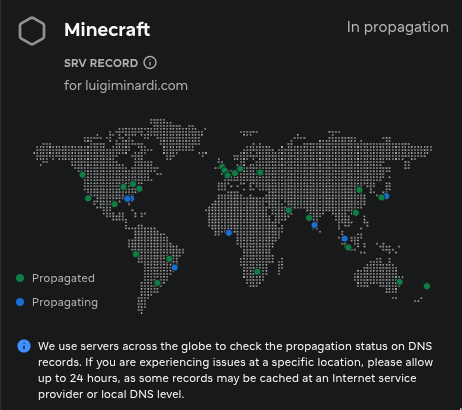
Some registrars show you the propagation state, you need to wait for it to
fully propagate for your server to work.
Every time you shut down your computer OR your VPN/switch VPN servers you need
to update your A record and your SRV record to match the new IP and port and
your server.properties to match the new port. Then wait the DNS to propagate
again and your server will be back to up and running.
If you configured your custom domain your players don’t need to do anything, if
you’re sharing your VPN IP and port with them then you need to share the new IP
and port for the server every time.
On your own machine since you access your port directly via localhost or a
local IP you will need to edit the port or your server in your minecraft
launcher to match the new port, else you wont be able to join your world.
Copy my configuration into it, remember to change the serverpanesjava
command to the same you use to launch your server and the root to the path
to your server files.
If you use bat you can replace tail on the on_project_stop with
bat /tmp/minecraft-pane.log -r -30:.
# ~/.config/tmuxinator/minecraft.ymlname:minecraftroot:~/.minecraft_servers/server1/# Run on project stopon_project_stop:| tmux send-keys -t minecraft:2.1 'title @a title {"text": "Server Shutting Down","color":"red"}' Enter;
tmux send-keys -t minecraft:2.1 'title @a subtitle {"text": "gracefully with tmuxinator","color":"aqua"}' Enter;
sleep 5;
tmux send-keys -t minecraft:2.1 "/stop" Enter;
sleep 2;
tmux capture-pane -t minecraft:2.1 -S -100 -p > /tmp/minecraft-pane.log;
tail /tmp/minecraft-pane.log -n 30# Specifies (by name or index) which window will be selected on project startup. If not set, the first window is used.startup_window:server# Controls whether the tmux session should be attached to automatically. Defaults to true.attach:falsewindows:- editor:layout:main-verticalpanes:- nvim server.properties- server:layout:main-verticalpanes:- java -Xms1G -Xmx4G -jar fabric-server-mc.26.1.2-loader.0.19.3-launcher.1.1.1.jar nogui
This config starts tmux in detached mode when you run the
start command and tells your players that the server is
shutting down and also logs the shutdown for you and display the last 30 lines
of the log for you to make sure everything worked propperly after running the
stop command.